Home coffee often tastes weak, bitter, or inconsistent because most brewing methods leave little room for control - or they bury you in variables you don't understand yet. The French press looks simple, but without the right grind size, water temperature, and timing, you'll end up with muddy sludge or sour, under-extracted brew that wastes good beans.
This guide walks you through a repeatable, beginner-friendly process that delivers rich, clean coffee every time. You'll learn exactly which grind to ask for, how hot your water should be, how long to steep, and how to press without making a mess. No guesswork, no expensive equipment, and no need to measure with lab precision.
By the end, you'll have a step-by-step routine you can follow in under ten minutes, from boiling water to pouring your first cup. The French press rewards consistency, and once you dial in these basics, you'll taste the difference immediately - fuller body, brighter flavor, and none of the bitterness that comes from rushing or over-steeping.
Who This Guide Is For
This guide is for anyone who has just bought a French press or is thinking about making the switch from drip coffee, single-serve pods, or instant varieties. If you want richer-tasting coffee without buying expensive equipment or learning barista techniques, the French press is one of the most approachable brewing methods to start with.
You don't need prior coffee knowledge or a grinder collection to get good results. This step-by-step walkthrough assumes you're starting from zero and will walk you through grind size, water temperature, timing, and pouring technique in plain language. The goal is consistent, full-flavored coffee that tastes better than what you're making now, using tools and ingredients you can pick up at any grocery store.
If you've tried a French press before and ended up with bitter, gritty, or weak coffee, this guide will help you troubleshoot the most common beginner mistakes. You'll learn what actually matters for flavor and what you can ignore while you're building confidence with the method.
What You'll Need Before You Start
- French press (any size)
- Coarsely ground coffee or whole beans and grinder
- Kettle or pot to heat water
- Timer or smartphone
- Stirring spoon (wood or plastic preferred)
- Mug or carafe for serving
Step 1: Heat Your Water to the Right Temperature
Water temperature is one of the most important variables in French press brewing. The ideal range is 195 - 205°F, which extracts the full flavor from your coffee grounds without scalding them or pulling out harsh, bitter compounds. Water that's too hot can over-extract and create a sharp, unpleasant taste, while water that's too cool will under-extract, leaving your coffee weak and sour.
If you don't have a thermometer, bring your kettle to a full boil, then let it sit off the heat for about 30 seconds. This simple rest period typically brings the water down into the target range. If you do have a kitchen or coffee thermometer, measure the water just before pouring to confirm it's between 195 and 205°F. Consistency here makes a noticeable difference in taste.
Avoid using water straight off a rolling boil. That extra heat doesn't improve extraction - it just tips the balance toward bitterness. Let the water settle briefly, and you'll get cleaner, more balanced flavor from the same beans and grind.
Step 2: Measure and Add Your Coffee Grounds
For a standard 8-ounce cup of French press coffee, use roughly 2 tablespoons of coffee grounds, which translates to a 1:15 coffee-to-water ratio by weight - about 15 grams of coffee for every 225 grams of water. If you're brewing a full 34-ounce French press, that's around 8 tablespoons or 60 grams of coffee. This ratio delivers balanced flavor without bitterness or weak extraction, and you can adjust slightly stronger or weaker to taste once you've dialed in the baseline.
Grind size matters more in a French press than in most other brew methods. You want a coarse grind that resembles kosher salt or breadcrumbs - if the grounds are too fine, they'll slip through the mesh filter and make your coffee gritty and over-extracted. Pre-ground coffee from the store is usually ground for drip machines and tends to be too fine, so grinding your beans fresh just before brewing gives you better control and noticeably cleaner flavor. If you're stuck with pre-ground, look for packages labeled "French press" or "coarse," though freshly ground beans will always produce a clearer cup with more vibrant taste.
Measure your grounds directly into the empty, dry French press carafe before adding water. Keeping the ratio consistent from brew to brew is the fastest way to build confidence and repeat results you enjoy.
Step 3: Pour Water and Start the Timer
Once your coffee is in the carafe, pour just enough water to saturate all the grounds - about twice the weight of the coffee - and let it bloom for 30 seconds. You'll see bubbles and foam rise as trapped carbon dioxide escapes, which is a sign your coffee is fresh. After 30 seconds, give the slurry a gentle stir with a wooden or plastic spoon to break up any dry clumps and ensure even extraction.
Now pour the remaining water in a slow, steady stream, filling to just below the metal band or spout. This keeps grounds from floating over the top and makes pressing easier later. Start your timer immediately once the carafe is full - four minutes is the standard steep time for a balanced cup.
Avoid pouring too fast or aggressively, as this can create uneven saturation and leave pockets of under-extracted coffee. The goal is to cover every ground evenly so the water can pull out sugars, oils, and solubles at the same rate. If you skip the bloom or stir, you may end up with sour or weak spots in the final cup, especially with lighter roasts that need more contact time to develop flavor.
Keep the lid and plunger assembly on top during the steep, with the plunger pulled all the way up, to retain heat. This simple step maintains a stable temperature and prevents the brew from cooling too quickly, which would slow extraction and dull the flavor.
Step 4: Stir and Let It Brew
After you pour the hot water over your coffee grounds, give the mixture a gentle stir with a wooden or plastic spoon to ensure even extraction. This brief stir helps break up any dry clumps floating on top and makes sure all the grounds are saturated, which leads to more balanced flavor throughout your brew.
Once you've stirred, place the lid on your French press with the plunger pulled all the way up - do not press down yet. The lid keeps heat in while the coffee steeps, but leaving the plunger raised prevents premature filtering. Set a timer for four minutes and let the coffee brew undisturbed.
The four-minute mark is the sweet spot for most medium-roast coffees. If you press too early, the coffee may taste weak and underdeveloped because the water hasn't had enough time to extract the flavors and oils from the grounds. If you wait much longer than five minutes, you risk over-extraction, which can make your coffee taste bitter or astringent. Stick to four minutes while you're learning, then adjust by 30 seconds in either direction once you understand how timing affects the flavor you prefer.
Avoid stirring again during the brewing time - just let it sit. The goal is a calm, even extraction where the grounds settle naturally, making it easier to press smoothly when the timer goes off.
Step 5: Press the Plunger Slowly
After four minutes of brewing, place your hand on top of the plunger and press down slowly using steady, gentle pressure. The plunger should take about 20 to 30 seconds to reach the bottom of the carafe, moving smoothly through the coffee grounds without sudden jerks or stops.
If the plunger feels very hard to push and refuses to move smoothly, your grind is likely too fine. Stop pressing, pour what you can, and use a coarser grind next time. Forcing a stuck plunger can bend the mesh filter or cause hot coffee to splash out the sides.
Pressing too quickly - slamming the plunger down in just a few seconds - stirs up fine particles and creates a cloud of sediment that ends up in your cup. It also forces water through the grounds unevenly, extracting bitter compounds that make the coffee taste harsh and astringent. Slow, controlled pressure keeps the grounds compact at the bottom and the brewed coffee clean and balanced.
Once the plunger reaches the bottom, pour the coffee immediately into your mug or a separate carafe. Leaving brewed coffee sitting on top of the compressed grounds continues extraction, turning your brew increasingly bitter with each passing minute.
Step 6: Pour and Serve Immediately
After pressing the plunger, pour all the coffee into your mug or cups right away. Leaving brewed coffee in the French press allows it to continue extracting, which leads to bitter, over-extracted flavors that overpower the balanced taste you worked to achieve. Even with the plunger down, the grounds remain in contact with the liquid, so timing matters.
If you brewed more than you plan to drink immediately, transfer the coffee to a separate thermal carafe or insulated container. This stops the extraction process and keeps your coffee warm without continuing to brew. Pouring into a preheated carafe helps maintain temperature if you're serving guests or saving a second cup for later.
You'll notice a small amount of fine sediment at the bottom of your cup, especially in the last sip. This is completely normal with French press coffee and part of the full-bodied character that makes this method popular. The mesh filter allows natural oils and some fine particles through, unlike paper filters that trap them. If you prefer less sediment, pour gently and leave the final quarter-ounce in the press, or consider a slightly coarser grind next time.
Serve your coffee fresh and enjoy the rich, aromatic cup you've brewed - drinking it within 15 to 20 minutes of pouring ensures you experience the flavors at their peak.
Common Mistakes to Avoid
Even with simple equipment, a few common mistakes can turn French press coffee bitter, muddy, or weak. Using grind that's too fine is the most frequent error - it slips through the mesh, clouds your cup, and makes pressing difficult. Stick with coarse grind that looks like breadcrumbs or sea salt, not powder.
Pouring boiling water directly onto the grounds scorches the coffee and brings out harsh flavors. Let your kettle sit for 30 seconds after boiling so the water drops to around 195 - 205°F, which extracts sweetness and clarity without bitterness.
Skipping the stir after adding water leaves dry pockets of grounds floating on top, leading to uneven extraction. A quick stir with a wooden spoon ensures every particle gets saturated and brews evenly.
Pressing the plunger too fast forces fine particles through the filter and makes the coffee gritty. Press slowly and steadily - if you feel strong resistance, stop, pull the plunger up slightly, then continue with gentle pressure.
Leaving brewed coffee in the press after you pour your first cup keeps extracting, turning the remaining liquid bitter and over-strong. Pour everything into a carafe or thermal mug right away, or accept that the last cup will taste heavier. Fixing these five mistakes will make your French press routine faster, cleaner, and more consistent every morning.
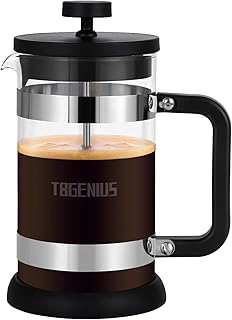
TBGENIUS 21 oz Borosilicate French Press Coffee Maker, Black
The TBGENIUS 21 oz Borosilicate French Press offers beginners an affordable way to practice the brewing steps in this guide without a large financial commitment. At $12.99, it removes the barrier to trying French press coffee at home and gives you a forgiving platform to learn grind size, timing, and plunge technique.
The borosilicate glass carafe resists thermal shock better than standard glass, so you can add hot water with less worry about cracking. The 21-ounce capacity brews enough for one generous mug or two smaller servings, making it practical for solo mornings or when you're dialing in your preferred coffee-to-water ratio. The black frame and handle provide a stable grip during the plunge, and the simple three-piece filter assembly is straightforward to disassemble and rinse after each use.
Because this press keeps the design minimal, you won't find extra features like measurement markings or a double-wall insulated carafe. If you plan to brew larger batches or want coffee to stay hot for extended periods, you may need a different model down the line. For learning the fundamentals and confirming you enjoy the French press method before upgrading, this entry-level option delivers the essentials at a price that won't sting if you decide to move to a larger or more feature-rich press later.
- ✅ Low $12.99 price point ideal for first-time buyers
- ✅ Borosilicate glass resists thermal shock
- ✅ 21 oz capacity suits one or two servings
- ✅ Simple filter assembly makes cleaning quick
- ⚠️ No measurement markings on carafe
- ⚠️ Single-wall glass won't keep coffee hot as long as insulated models
- ⚠️ Minimal features may prompt upgrade as skills develop
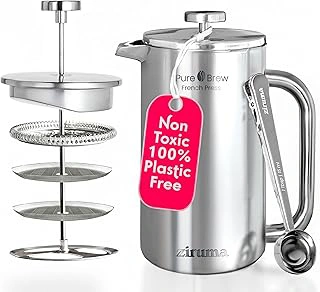
Ziruma Surgical Stainless Steel French Press, 34 oz, Double Wall, 4-Layer Filter
The Ziruma Surgical Stainless Steel French Press offers a 34-ounce capacity that brews multiple servings, making it a practical choice for households or mornings when you need more than a single cup. Unlike glass models, the double-wall stainless steel construction keeps coffee hotter longer and resists breaking if knocked or dropped on the counter.
The 4-layer filter system is designed to catch more grounds than standard single-screen presses, reducing sediment in the cup. This tighter filtration works best with a coarse, consistent grind - if your grind is too fine or uneven, you may find the plunger harder to press or notice a slower pour.
At $42.95, this press sits above entry-level glass options but delivers better heat retention and durability. The stainless steel body also means you can't watch the bloom or brewing process through the sides, which some beginners find helpful for learning timing and technique. The solid build and larger capacity make it a good step-up once you're comfortable with the basic French press routine and want a more rugged option for daily use.
Rated 4.7 out of 5, the Ziruma balances thermal performance, capacity, and filtration quality for users who prioritize temperature stability and cleanup over visual brewing cues.
- ✅ 34-ounce capacity brews 3 - 4 servings
- ✅ Double-wall stainless steel retains heat longer than glass
- ✅ 4-layer filter reduces sediment in the cup
- ✅ Durable construction resists breaking
- ⚠️ Opaque body hides bloom and brew progress
- ⚠️ Tighter filter may slow plunger if grind is too fine
- ⚠️ Higher price than basic glass presses
Final Takeaway: Practice Makes Consistent Coffee
French press brewing is straightforward once you complete the routine a few times. The four core steps - measure coffee, add hot water, steep four minutes, press slowly - deliver rich, full-bodied coffee with minimal equipment and no learning curve beyond your first week.
Start with the 1:15 coffee-to-water ratio and the timing outlined earlier, then adjust both to match your taste after three or four brews. Prefer stronger coffee? Use a bit more grounds or extend the steep by 30 seconds. Want less sediment? Pour more gently and stop before the plunger reaches the bottom. The process is forgiving, and small changes make a noticeable difference without requiring precision tools.
Compared to drip machines or pod systems, a French press gives you more control over flavor and uses no filters or capsules. You'll taste more of the coffee's natural oils and character, and cleanup takes less than a minute. Once the steps feel automatic, you'll brew consistently better coffee at home with the same effort it takes to press a button.