The AeroPress is one of the most forgiving coffee brewers on the market, yet many home brewers struggle with bitter, weak, or inconsistent cups. The problem usually isn't the device - it's a handful of avoidable mistakes that compound with each brew. Small errors in grind size, water temperature, filter handling, or pressing technique can turn what should be a smooth, balanced cup into something you'd rather pour out than finish.
Most AeroPress users never realize they're making these mistakes because the brewer still produces coffee, just not the coffee it's capable of. You might assume your beans are the issue, or that the AeroPress simply doesn't live up to the hype. In reality, a few simple adjustments - many taking less than a minute to implement - can dramatically improve flavor, consistency, and clarity.
This guide walks through the most common AeroPress mistakes in order of impact, from the errors that ruin every cup to the subtle tweaks that unlock better extraction. Each fix is practical, immediately actionable, and grounded in how the AeroPress actually works. By the end, you'll know exactly what to change and why it matters for your daily brew.
Quick Checklist: Avoid These Mistakes Every Time
- Use medium-fine grind (finer than drip, coarser than espresso)
- Heat water to 175 - 185°F or let boiled water rest 60 - 90 seconds
- Rinse the paper filter before brewing
- Measure your coffee and water consistently
- Press slowly and steadily over 20 - 30 seconds
- Experiment with steep time to dial in your taste
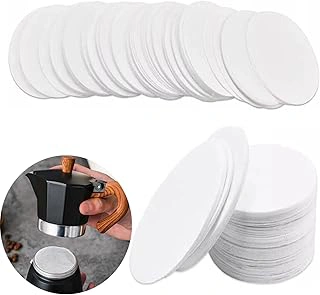
500 Count Round White Disposable Paper Coffee Filters for AeroPress
Running out of filters mid-week is one of the easiest AeroPress mistakes to make, especially if you brew daily. This 500-count round white paper filter pack offers a straightforward solution for cost-conscious users who want to stock up without frequent reordering. At $5.99 for the full set, the per-filter cost stays well below a few cents each, making it a practical choice for consistent home brewing.
These disposable paper filters are sized to fit the AeroPress chamber and work the same way as standard filters: they capture fine coffee grounds during pressing while allowing oils and solubles through. The white paper construction means they filter cleanly without adding flavor, and the round shape matches the AeroPress geometry. Because this is a bulk pack, you'll have filters on hand for months of daily use, eliminating the risk of running out at inconvenient times.
The main tradeoff is storage - 500 filters take more space than a single box of branded filters - but the value and convenience often outweigh that consideration. If you brew multiple cups per day or share your AeroPress with others, this bulk option reduces both cost per cup and the frequency of resupply trips. For users who want to avoid the mistake of skipping filtration or reusing filters too many times, keeping a large supply ready is a simple, reliable fix.
- ✅ 500 filters for under $6 keeps per-cup cost very low
- ✅ Round shape fits AeroPress chamber without trimming
- ✅ White paper filters cleanly without flavor contribution
- ✅ Bulk pack eliminates frequent reordering
- ⚠️ Takes more storage space than smaller packs
- ⚠️ No brand affiliation may concern users who prefer OEM filters
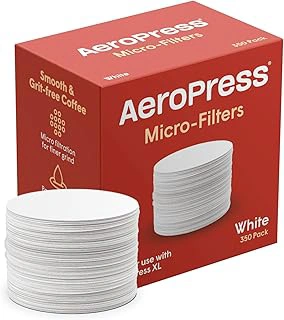
AeroPress 350 Count White Compostable Paper Micro-Filters
Replacing filters regularly keeps your AeroPress brewing clean and consistent, and the AeroPress 350 Count White Compostable Paper Micro-Filters deliver both performance and an eco-friendly disposal option. These OEM filters are designed to fit the AeroPress chamber precisely, eliminating the bypass and channeling issues that sometimes occur with off-brand alternatives.
Each filter is manufactured from compostable paper, so you can dispose of your used puck in a compost bin rather than adding to landfill waste. The 4.8/5 rating reflects strong user satisfaction with fit, flow rate, and the clean cup these filters produce. At $9.94 for 350 filters, the per-brew cost is approximately three cents - reasonable for the quality and peace of mind that comes with using the manufacturer's specification.
The white micro-filters rinse quickly under warm water before brewing, and they release from the coffee puck cleanly during disposal. Because they match the AeroPress chamber diameter exactly, you won't need to trim edges or deal with uneven sealing. For brewers who value sustainability alongside consistency, these compostable filters offer a straightforward solution without sacrificing cup quality or adding complexity to your routine.
- ✅ Compostable paper reduces landfill waste
- ✅ Precise OEM fit eliminates bypass and channeling
- ✅ 4.8/5 rating reflects strong user satisfaction
- ✅ Clean release from coffee puck during disposal
- ⚠️ Higher per-filter cost than bulk third-party packs
- ⚠️ 350-count supply may require frequent reordering for daily users
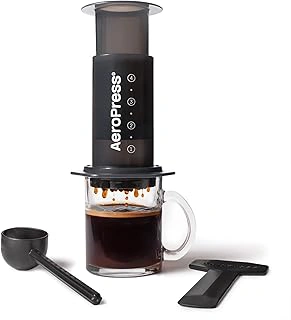
AeroPress Original Portable Coffee & Espresso Maker with Filters
The AeroPress Original Portable Coffee & Espresso Maker ships with everything needed to start brewing: the chamber, plunger, filter cap, stirrer, scoop, funnel, and multiple micro-filters. This single-serve brewer uses air pressure to push water through coffee grounds, producing a smooth, low-acidity cup in about one minute. Its simplicity makes it easier to isolate and correct common mistakes - grind size, water temperature, and brew time all show immediate results in your cup.
The included micro-filters are paper and disposable, designed to catch fine particles while allowing oils and flavor compounds to pass through. Because the AeroPress uses a short immersion phase followed by gentle pressure, over-extraction is less likely than with a French press left to steep too long. The chamber markings provide clear volume guides, which helps maintain consistent coffee-to-water ratios once you find your preferred recipe.
Portability is a standout feature: the entire kit nests inside the chamber and weighs less than a pound, fitting easily into a backpack or suitcase. The plastic construction is BPA-free and durable enough for daily home use or travel. Cleanup takes seconds - eject the puck of spent grounds, rinse the plunger seal, and you're done.
For beginners working through the mistakes covered in this guide, the AeroPress offers a forgiving learning curve. Adjustments to grind, temperature, or steep time produce noticeable changes without requiring expensive equipment or complex technique. At $39.95, it's an accessible entry point for anyone wanting better control over their morning coffee and fewer variables to troubleshoot.
- ✅ Includes 350 micro-filters, stirrer, scoop, and funnel in the box
- ✅ One-minute brew time with clear chamber markings for consistent ratios
- ✅ Compact and lightweight - nests into chamber for easy travel
- ✅ Simple cleanup with quick puck ejection and rinse
- ⚠️ Single-serve only - not suited for brewing multiple cups at once
- ⚠️ Paper filters require ongoing replacement purchases

Patelai 2-Piece Reusable Stainless Steel Coffee Filters for AeroPress
Switching to a reusable stainless steel filter changes the character of your AeroPress coffee - more body, more oils, and a richer mouthfeel. The Patelai 2-Piece Reusable Stainless Steel Coffee Filters for AeroPress replace disposable paper filters entirely, which appeals to users looking to eliminate ongoing waste or explore a bolder flavor profile. Each pack includes two filters, so you can rotate while cleaning.
The tradeoff is real: metal filters allow more coffee oils and fine particles through, which delivers fuller body but also means a bit of sediment at the bottom of your cup. If you prefer the clean, bright clarity that paper filters provide, metal may not suit your taste. Cleanup requires a quick rinse and occasional scrub to prevent oil buildup, which takes more effort than tossing a paper filter.
At $6.39, this set offers an economical way to experiment with how filtration affects your brew. The filters fit standard AeroPress chambers and work with both inverted and traditional methods. If you're curious about how oils influence flavor or want to reduce filter waste, this is a low-risk entry point. Just expect a different cup - thicker, oilier, and less polished than paper-filtered coffee.
- ✅ Eliminates need for disposable paper filters
- ✅ Delivers fuller body and more coffee oils in the cup
- ✅ Two filters included for rotation
- ✅ Fits standard AeroPress chambers
- ⚠️ Allows fine sediment into the cup
- ⚠️ Requires rinsing and scrubbing to prevent oil buildup
- ⚠️ Produces less clarity than paper filters
Who This Guide Is For
This guide is for AeroPress owners who brew regularly but aren't getting the flavor they expect, along with anyone new to the device who wants to skip the most common pitfalls from the start. If your coffee tastes weak, bitter, or different every time you brew, the fixes are usually simpler than you think - and they don't require specialty equipment or expensive upgrades.
You'll also benefit from this article if you've been using the AeroPress for a while but feel like something is off. Small adjustments to grind size, water temperature, or brew time can make a noticeable difference in taste and consistency. The goal here is to help you understand what really matters so you can troubleshoot on your own and dial in a cup you enjoy every morning.
Whether you're chasing clarity, body, or balanced sweetness, the mistakes covered in this guide are the ones that most often stand between you and a better brew. The solutions are practical, repeatable, and designed to work with the tools you already have.
Mistake #1: Using the Wrong Grind Size
Grind size directly controls how quickly water extracts flavor from coffee, and getting it wrong is one of the fastest ways to ruin an AeroPress brew. When grounds are too fine, water moves through the coffee bed slowly, creating over-extraction that tastes bitter and astringent - and the plunger becomes difficult or even painful to press. When grounds are too coarse, water flows through too quickly, under-extracting the coffee and leaving you with a weak, sour, tea-like cup that lacks body and sweetness.
The ideal starting point for AeroPress is a medium-fine grind, somewhere between what you'd use for drip coffee and the powder-fine texture of espresso. The grounds should feel slightly gritty when rubbed between your fingers, similar to table salt or fine sand. This consistency allows water to extract balanced flavor in the AeroPress's short steep time while still letting you press smoothly with moderate, even pressure.
If you're using pre-ground coffee, look for bags labeled "fine" or "espresso" and use slightly less steep time to compensate for the finer texture. For grinder owners, start with a setting one or two notches finer than your drip setting and adjust from there: if the plunger resists too much, go coarser; if your coffee tastes thin or sour, go finer. Dialing in grind size for your specific beans and recipe takes only two or three test brews, and the improvement in flavor consistency makes it the single most valuable adjustment you can make.
Mistake #2: Water Temperature Too Hot or Too Cold
Using water that's either too hot or too cold is one of the fastest ways to ruin an otherwise solid AeroPress brew. Boiling water - around 212°F at sea level - scalds the coffee grounds, pulling harsh, bitter compounds that overpower the nuanced flavors you're trying to highlight. On the other end, water below 170°F often under-extracts, leaving you with a weak, sour, or flat cup that tastes thin and underdeveloped.
The sweet spot for most AeroPress recipes sits between 175°F and 185°F. This range extracts sugars, acids, and aromatic oils efficiently without tipping into astringency. If you don't have a thermometer, bring your water to a full boil, then let it rest off heat for 60 to 90 seconds before pouring - this typically drops the temperature into the ideal window.
Different roast levels respond differently to temperature. Lighter roasts often benefit from the higher end of the range (closer to 185°F) to fully develop their bright, complex flavors, while darker roasts can taste smoother and less bitter at the lower end (around 175°F). Experiment within this band to match your beans and taste preference.
Consistency matters as much as the target number. If your water temperature swings wildly from brew to brew, your results will too. A simple kitchen thermometer or an electric kettle with temperature control removes the guesswork and helps you dial in a repeatable routine that works every time.
Mistake #3: Skipping the Filter Rinse
Rinsing the paper filter before brewing removes the papery taste that can otherwise seep into your coffee, especially in lighter roasts where off-flavors stand out. The rinse also preheats the brewer and brewing chamber, which helps maintain stable temperature during extraction, and wets the filter so it seals properly against the cap without shifting when you press.
This step takes about five seconds: place the filter in the cap, set it over your mug or server, and pour hot water through until the filter is fully saturated. Discard the rinse water, then attach the cap and proceed with your brew. The difference in cup clarity and taste is immediate - no residual paper flavor, just clean coffee. If you skip the rinse, you may notice a faint astringency or flatness, particularly in single-origin coffees where subtle notes matter. Always rinse, even when you're in a rush; it's one of the easiest ways to improve consistency without changing your recipe.
Mistake #4: Inconsistent Coffee-to-Water Ratio
Eyeballing your coffee and water measurements is one of the fastest ways to end up with a different cup every time you brew. Without a consistent coffee-to-water ratio, you'll swing between watery, under-extracted coffee and overly strong, bitter brews - even when everything else stays the same.
A good starting point is 15 - 17 grams of coffee to 220 - 240 milliliters of water. This ratio typically produces a balanced, medium-strength cup that you can adjust to taste. If you prefer a bolder brew, increase the coffee slightly or reduce the water. For a lighter cup, use less coffee or add more water. The key is to measure each time so you can replicate what works and troubleshoot what doesn't.
The AeroPress itself has numbered markings on the chamber, which can help you gauge water volume, but they're not precise enough for dialing in a recipe. A simple kitchen scale is the most reliable tool - weigh your coffee, tare the scale, then add water by weight (1 gram equals roughly 1 milliliter). This removes guesswork and makes it easy to repeat successful brews or tweak variables one at a time.
Consistency matters more than hitting a specific "perfect" ratio. Once you find a ratio you enjoy, stick with it long enough to notice how grind size, water temperature, and steep time interact with it. That repeatable baseline is what lets you improve your technique over time instead of chasing random results.
Mistake #5: Pressing Too Fast or Too Hard
Pressing too fast or applying excessive force is one of the most common ways to ruin an otherwise well-prepared AeroPress brew. The ideal press should take 20 - 30 seconds with slow, steady pressure that feels controlled and even throughout the entire stroke.
When you rush the press or push too hard, several problems arise. Fast pressing forces water through the coffee bed unevenly, creating channels where water flows too quickly through some areas while bypassing others entirely. This results in simultaneous over-extraction and under-extraction in different parts of the puck, producing a cup that tastes both bitter and sour at the same time. Excessive force also compresses the coffee grounds too tightly, increasing resistance and pushing out harsher compounds that contribute astringency and unwanted bitterness.
Pressing too hard carries a practical risk as well: you can blow out the seal between the cap and chamber, spraying hot coffee and grounds across your counter or, worse, onto your hands. The AeroPress is designed to work with gentle, consistent pressure - not the full weight of your body leaning into the plunger.
To find the right pace, start pressing gently and maintain constant, even pressure as you move the plunger downward. You should feel moderate resistance, but it shouldn't require significant effort. If the press feels extremely difficult, your grind is likely too fine. If the plunger drops with almost no resistance, your grind is too coarse. The sweet spot is a smooth, controlled descent that takes at least 20 seconds from the start of the press until you hear the hiss of air, signaling that all the liquid has been pushed through.
Some experienced brewers press even more slowly - up to 45 seconds - to maximize clarity and sweetness, though 20 - 30 seconds is the standard target for balanced extraction. Listen to your coffee: a slow, steady press gives you clean flavor, good body, and the nuanced characteristics that make the AeroPress such a versatile brewer.
Mistake #6: Not Experimenting with Brew Time
Steep time is one of the easiest variables to adjust, yet many AeroPress users stick with a single timing without exploring how it shapes flavor. Pressing immediately after adding water often produces thin, under-extracted coffee, while waiting too long can introduce bitterness if your grind is too fine or your ratio is off.
A shorter steep - around one minute - tends to produce brighter, lighter cups with more acidity and clarity. This works well for fruity, floral coffees where you want those delicate notes to shine. A longer steep of two to three minutes builds fuller body and richer mouthfeel, drawing out more sweetness and complexity from darker roasts or coffees with chocolate and nutty profiles.
Start with a baseline of 90 seconds, then shift up or down by 30-second increments based on taste. If your cup feels sharp or sour, extend the steep. If it tastes flat or overly bitter, shorten it or coarsen your grind. Because the AeroPress allows you to control agitation and pressure independently, brew time becomes a precision dial rather than a guessing game.
The key is to change only one variable at a time so you can learn what each adjustment does to your cup. Once you find a steep time that matches your preferred balance of brightness and body, you'll have a repeatable formula that works across different beans and roast levels.
Final Takeaway
The AeroPress rewards small improvements more than almost any other brewing method. Fix one mistake at a time - grind size, water temperature, filter placement, or brew time - and taste the difference in your next cup. You don't need to chase perfection; consistency matters more than flawless technique, and the AeroPress is forgiving enough to let you learn as you go.
Start with the mistake that sounds most familiar, adjust it tomorrow morning, and notice what changes. Most people see clearer flavor and smoother body within a few brews once they stop over-stirring or using boiling water. The beauty of this brewer is that it meets you where you are - whether you're rushing through a weekday routine or fine-tuning a weekend recipe, avoiding these common pitfalls keeps your coffee predictable and enjoyable.
Brewing better coffee at home isn't about expensive gear or complex rituals. It's about understanding what each variable does and making intentional choices instead of repeating the same errors. With these mistakes behind you, every cup becomes a chance to dial in something you actually look forward to drinking.