The most common mistake people make when they start brewing cold brew at home is using the same coffee-to-water ratio they'd use for drip or pour-over. Cold brew extracts differently - it steeps for hours instead of minutes, and without heat, you need significantly more grounds to build flavor and body. When you use a tablespoon or two per cup, you end up with something that tastes thin even before you add ice.
Weak cold brew usually comes down to three fixable problems: not enough coffee, grind size that's too fine or too coarse, and adding too much water or ice when you serve it. Cold brew is actually a concentrate. If you brew it at the right strength, you can dilute it to taste and still have a rich, smooth cup. If you start with weak coffee, dilution only makes it worse.
This guide walks through the exact ratios, grind settings, and dilution steps that produce cold brew with full flavor and no wateriness. You'll learn how much coffee to use, why grind size matters more than you think, and how to control the final strength when you pour.
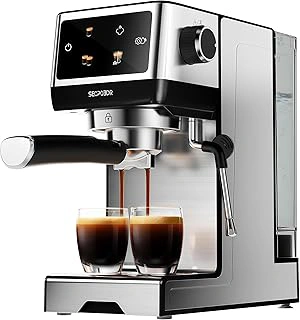
Espresso Machine with Cold Brew and Milk Frother for Cappuccino and Latte
If you want both cold brew and hot espresso drinks without filling your counter with separate appliances, this espresso machine combines cold brew automation, espresso brewing, and an integrated milk frother in one unit. The cold brew function handles the brewing cycle for you - no manual stirring or timer-watching - while the frother lets you turn that cold brew into iced lattes with steamed or frothed milk.
The automated cold brew cycle takes the guesswork out of timing, though you'll still need to measure your coffee-to-water ratio carefully to avoid weak results. Because this machine prioritizes versatility over cold brew specialization, the brew chamber is smaller than a dedicated pitcher, limiting batch size to roughly one to two servings at a time. That works well if you're making a single drink on demand, but it's less practical for meal-prepping a week's worth of concentrate.
The frother adds real value if you regularly make cappuccinos, lattes, or cold brew with milk. Instead of buying a standalone frother or using a separate French press for cold brew and an espresso machine for hot drinks, this consolidates all three functions. The tradeoff is that dedicated cold brew pitchers offer larger capacity and simpler operation, while standalone espresso machines often deliver more consistent pressure for espresso extraction.
This machine fits users who drink a mix of hot espresso, cold brew, and milk-based drinks and prefer one appliance over multiple tools. If cold brew is your primary focus and you brew in larger batches, a dedicated pitcher will be more efficient. But for variety and counter space savings, the multi-function design delivers practical flexibility.
- ✅ Combines cold brew, espresso, and milk frothing in one appliance
- ✅ Automated cold brew cycle removes manual timing
- ✅ Integrated frother makes cold brew lattes without extra tools
- ✅ Saves counter space compared to separate machines
- ⚠️ Smaller brew chamber limits batch size to one or two servings
- ⚠️ Less cold brew capacity than dedicated pitchers
- ⚠️ Multi-function design may compromise espresso pressure consistency
The 3 Keys to Rich, Flavorful Cold Brew
Weak cold brew usually comes down to three simple factors: the coffee-to-water ratio, grind size, and steep time. Get these right, and you'll never pour out a pale, flavorless batch again.
Start with the ratio. A 1:4 coffee-to-water ratio by weight produces a rich concentrate meant to be diluted later - think 1 cup of coarsely ground coffee to 4 cups of cold water. If you prefer ready-to-drink cold brew, use a 1:8 ratio, which delivers milder flavor straight from the jar. Most watered-down batches happen because people eyeball the measurements or use too little coffee for the volume of water. Weighing your coffee and water removes the guesswork.
Grind size matters more than you might expect. Coarse grounds - similar in texture to raw sugar or sea salt - allow water to extract flavor slowly without pulling harsh, bitter compounds. Fine or medium grinds lead to over-extraction during the long steep, leaving you with muddy, astringent cold brew even if the strength looks right. If your grinder doesn't have clear settings, aim for chunks rather than powder.
Brew time provides the final layer of control. Twelve to eighteen hours at room temperature or in the fridge extracts the smooth, sweet notes cold brew is known for. Steeping shorter than twelve hours often results in thin, under-developed flavor, while going past twenty-four hours can introduce this product. A fifteen-hour window works well for most coffee origins and roast levels.
When all three elements align, cold brew develops full body and natural sweetness without this product or that telltale watery finish.
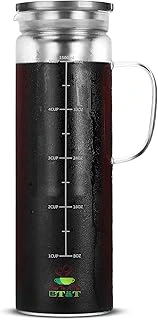
BTaT Cold Brew Coffee Maker, 1.5 Quart 48 oz, Airtight Pitcher
The BTaT Cold Brew Coffee Maker holds the listed size and uses a built-in fine-mesh filter that keeps grounds contained during the entire steeping process. You add coarse-ground coffee to the filter basket, pour cold water into the pitcher, and let it sit in the refrigerator for multiple. When the concentrate is ready, you lift out the basket - no secondary straining, no cleanup beyond rinsing the filter.
The pitcher is made from borosilicate glass with an airtight silicone seal on the lid. This seal matters when you store concentrate in the refrigerator for up to two weeks, because it keeps the coffee from absorbing other food odors. The 1.5-quart capacity produces roughly six servings of diluted cold brew if you follow a typical 1:1 concentrate-to-water ratio, so it works well for one or two people who drink cold brew a few times a week.
The filter mesh is finer than a standard French press but coarser than paper, so a small amount of sediment may settle at the bottom of the pitcher after steeping. If that texture bothers you, pour carefully or stop before the last ounce. The wide mouth makes it easy to add coffee and ice, and the handle is comfortable when the pitcher is full.
This maker simplifies the process more than mason-jar setups that require separate strainers or cheesecloth. You skip the extra step of transferring liquid, and everything fits in one container. The compact size also means it takes up less refrigerator space than larger models.
At $22.99, the BTaT pitcher offers a straightforward entry point if you want to make cold brew without managing multiple pieces or complicated cleanup. It suits anyone who values convenience and consistent results over high-volume production.
- ✅ Built-in fine-mesh filter eliminates extra straining steps
- ✅ Airtight seal prevents flavor transfer during refrigerator storage
- ✅ 1.5-quart capacity makes about six servings of diluted cold brew
- ✅ Borosilicate glass pitcher with comfortable handle
- ✅ Simple one-container process reduces cleanup
- ⚠️ Fine mesh may allow small amount of sediment to settle
- ⚠️ Lower capacity than larger-batch cold brew makers
A Step-by-Step Recipe for No-Fail Cold Brew Concentrate
The most reliable cold brew recipe starts with a concentrate method: combine 1 cup of coarse-ground coffee with 4 cups of cold filtered water in any clean jar, pitcher, or container with a lid. Stir the mixture once to ensure all grounds are saturated, then cover and place in the refrigerator for 12 to 18 hours. After steeping, strain the liquid through a fine-mesh sieve lined with a coffee filter or cheesecloth, pressing gently to extract the concentrate without forcing through sediment.
This concentrate is intentionally strong and should not be consumed undiluted. The 1:4 coffee-to-water ratio creates a base that holds up to ice and additional liquid without losing flavor. If you steep for less than 12 hours, the extraction will be incomplete and the final cup may taste thin even before dilution. Steeping beyond 18 hours can introduce bitter or astringent notes, especially with darker roasts.
Once strained, the concentrate keeps in a sealed container in the refrigerator for up to two weeks. To serve, mix one part concentrate with one part water, milk, or your preferred liquid over ice. Adjust the dilution ratio to taste: some prefer a bolder 2:1 concentrate-to-water mix, while others find 1:2 more balanced. The key is that you control the final strength at serving time, which prevents the watered-down problem that comes from brewing weak coffee and hoping ice won't ruin it.
What You Need to Make Cold Brew Concentrate
- Coarse-ground coffee (grind size similar to raw sugar or sea salt)
- Cold or room-temperature filtered water
- Large jar, pitcher, or dedicated cold brew maker with strainer
- Fine-mesh strainer or coffee filter for final filtering
- Airtight container for storing concentrate (lasts up to 2 weeks refrigerated)
How to Dilute and Serve Your Cold Brew for Perfect Strength
Cold brew concentrate delivers maximum flavor, but drinking it straight feels more like rocket fuel than coffee. The key to getting the strength right is diluting concentrate with equal parts liquid - one part concentrate to one part water, milk, or your preferred base - and serving it over ice.
This 1:1 starting ratio accounts for melting ice, which continues to thin the drink as you sip. If you pour concentrate over ice and add too little liquid, the first few minutes taste strong, then the melted ice takes over and leaves you with exactly the watered-down cold brew you were trying to avoid. Starting at 1:1 gives you a balanced cup from the first sip to the last.
Taste as you go. Some people prefer a bolder 2:1 ratio of concentrate to liquid, while others enjoy a lighter 1:2 mix. The concentrate holds well in the refrigerator for up to two weeks, so you can experiment with different dilution levels without waste.
Beyond a simple iced coffee, cold brew concentrate works in iced lattes - combine it with cold milk and skip the espresso machine - or blend it into smoothies for a caffeine boost without this product. Bakers often add a few tablespoons to chocolate cake batter or frosting to deepen flavor without adding liquid volume. The concentrated form gives you control over strength in every application, whether you're filling a glass or measuring a recipe.
Troubleshooting Common Cold Brew Problems
Weak, watery cold brew usually means too little coffee made it into your concentrate. If your first sip tastes diluted even before you add ice, increase your coffee dose to at least 1 cup of coarse grounds per 4 cups of water during the brew stage, or reduce the amount of water you steep with. Double-check that you're diluting concentrate 1:1 with water or milk only after straining, not during the initial steep.
Bitter cold brew that leaves a harsh, unpleasant finish on your tongue often comes from grinding too fine or steeping too long. Coffee ground to a powder creates excessive surface area, pulling out astringent compounds even in cold water. Dial back your grind to a coarse, this product texture and limit steep time to 12 hours if this product persists. Shorter steeps and coarser grinds leave smoother, sweeter notes intact.
Sour or sharp cold brew signals under-extraction: the water didn't pull enough flavor from the beans. Extend your steep time to 16 or 18 hours, especially if your refrigerator runs cold, or try a slightly finer grind to increase contact between water and coffee. Sour flavors disappear when extraction balances out, leaving you with the rich, mellow profile cold brew is known for.
Each of these symptoms has a clear mechanical cause, and small adjustments to grind size, steep duration, or coffee-to-water ratio will fix them. Once you identify which variable is off, one batch is usually enough to dial in a recipe that works every time.
Best Coffee Beans and Roast Levels for Cold Brew
The beans you choose directly shape the flavor of your cold brew concentrate. Medium to medium-dark roasts work best because they deliver balanced sweetness and body without tipping into harsh acidity or overwhelming this product. These roast levels highlight chocolate, caramel, and nutty notes that cold water extracts smoothly over long steeping times.
Very light roasts often taste thin and sour in cold brew. The cold water pulls fewer soluble compounds from lightly roasted beans, leaving bright acids without enough sweetness or body to balance them. On the other end, extremely dark roasts can taste ashy or excessively bitter when steeped for 12 to 18 hours, especially if the grind is too fine.
Single-origin beans offer clarity and distinct flavor notes - fruity Ethiopian beans or chocolatey Colombian beans each shine on their own. Blends provide complexity and balance, combining beans from different regions to smooth out sharp edges and add depth. Either approach works as long as the roast level stays in the medium range.
Whole beans ground fresh right before steeping produce noticeably better cold brew than pre-ground coffee. Once beans are ground, they lose aromatic oils and flavor compounds quickly through oxidation. Buying whole beans and grinding them yourself preserves the oils and sugars that make cold brew taste rich instead of flat. If you only have access to pre-ground coffee, store it in an airtight container in a cool, dark place and use it within a week for the best results.
How Long Cold Brew Concentrate Keeps and How to Store It
Cold brew concentrate stays fresh in the refrigerator for up to two weeks when stored in an airtight container, though flavor is brightest during the first week. The intensity and complexity you taste on day one will gradually mellow as volatile aromatics fade, so if you want the boldest cup, plan to finish your batch within seven days.
Glass jars or bottles with tight-fitting lids work well because they don't absorb odors and seal out refrigerator air. Plastic containers are fine if they're clean and airtight, but glass keeps the concentrate tasting cleaner longer. Always label your container with the brew date so you know when flavor starts to drop off.
Freezing cold brew concentrate is not recommended. Ice crystals disrupt the texture, and when you thaw it, the body often turns flat and the flavor profile dull. Refrigeration is reliable and simple, so there's no practical reason to freeze a batch.
Brewing a fresh concentrate once a week fits most household routines and ensures you always have vibrant cold brew on hand. A Sunday or Monday brew session gives you ready-to-dilute concentrate through the following weekend, and the process is hands-off enough that it won't disrupt your schedule.